nplus Quickstart Guide#
The charts are built in a way that they provide minimal functionality without any configuration, using default values.
- If you want ingress, you have to configure the domain. Without the domain set, your charts will not have any default way to access them. However, you can still forward traffic to them or configure a NodePort or LoadBalancer manually.
- If you want proper TLS, you need a certificate. Without the certificate provided, a self-signed certificate will secure your connection.
- If you want specific storage, configure the storage class to use. Without it, you will get the default class for RWO and RWX.
This Quick Start example has nothing configured, so you will get:
- No ingress, and
- Default storage.
Access to the nplus Subscription and the nscale License#
You need access to:
- The nplus Helm chart repository
- The nplus container registry
- The nscale license
- The nscale container registry
In the next examples, we will use environment variables to access:
NPLUS_ACCOUNT="[your nplus subscription]"
NPLUS_TOKEN="[your nplus access token]"
NSCALE_ACCOUNT="[your account to access the Ceyoniq container registry]"
NSCALE_TOKEN="[the access token for above]"
NSCALE_LICENSE="[the path and license file to use]"
The nplus helm repository#
You can register the nplus Helm registry:
helm repo add nplus https://git.42i.org/api/packages/nplus/helm \
    --username $NPLUS_ACCOUNT \
    --password $NPLUS_TOKEN
helm repo update
You should now be able to access the charts:
% helm search repo nplus --versions --devel
NAME                            CHART VERSION  APP VERSION  DESCRIPTION
gitea/nplus-application         9.1.1201-16    0.2.2        Application Chart
gitea/nplus-application         9.1.1201-15    0.2.2        Application Chart
gitea/nplus-application         9.1.1201-14    0.2.2        Application Chart
...
The
--develoption gives you beta versions as well. Otherwise, you will only see release versions.
The nscale license#
Make sure you received an nscale license that fulfills the following criteria:
Container: 1- otherwise it will not allow to be run in a container environment- The Storage Layer
ServerIDmust not be included in the license, as we cannot override it if it is fixed FullyQualifiedHostName: 0- If this setting is on, the nstl will not work without the ServerID in the licenseDomainOnly: 1- If this setting is on, the nstl will not work without the ServerID in the licensehostname: "*"- As hostnames are not really deterministic in Kubernetes, we need a license that allows the hosts to
have any name.- Make sure you have the storage adapter licensed, that you want to use (like S3, Azure BlobStore or Harddisk)
- Optional: If you want High Availability with nscale Server Storage Layer, you need to have
DistributedService: 1, otherwise the nstl instances can not communicate.
nplus Cluster Resources#
nplus also includes Cluster Resources (independent of Namespaces). These need to be installed first and globally.
helm install nplus nplus/nplus-clusterYou only need to perform this step once per Cluster, regardless of Environments/Namespaces.
If you don’t want the nplus Helm application to appear in the current Namespace, you can install it as follows:
helm template nplus nplus/nplus-cluster | kubectl apply -f -After installing the cluster chart, you can test it by asking your cluster for deployed nscale resources:
$ kubectl get instance,component
No resources found in lab namespace.
Instances (also accessible via nscale or nplus) and components are custom resource definitions. Every Instance/Component installed will add an instance/component resource, and an nplus operator (which comes with the environment chart) will continuously check the instance/component health and report it via this command line or a web interface (see below).
Create an nplus Environment#
You can deploy nplus into a Kubernetes namespace. If you do not specify one, you will use the default one, which is fine for our test cluster. If you use namespaces, you can have multiple nplus environments in your cluster. Any environment can operate multiple nplus instances. Every nplus instance normally holds many components, each being ReplicaSets with multiple replicas.
To create a simple nplus environment without any additional features, deploy it into your new cluster:
By setting
--devel, we are fetching the latest development version
% helm install --devel demo nplus/nplus-environment
NAME: demo
LAST DEPLOYED: Tue Dec 19 16:39:51 2023
NAMESPACE: default
STATUS: deployed
REVISION: 1
TEST SUITE: None
NOTES:
nplus-environment 0.2.2-16 / 0.2.2

This Environment Chart provides a common config pool and administrative tools to operate all nplus instances in this namespace. There must be exactly one deployed instance of this environment chart. Without the environment, the instance and component charts will fail to deploy.

To uninstall, use
   helm uninstall demo

The environment DAV Server is disabled.
The nstore Downloader is disabled.
The toolbox is disabled.

Providing 10Gi of storage under the name "conf" of class "default"
Now you have an empty cluster ready to get a first instance deployment.
Single Instance Mode#
If you want to separate tenants on your system not only by instance but also by environment / namespace, you can run nplus in single instance mode.
SIM (Single Instance Mode) lets you deploy your instance including all components of the environment in one single chart. Please see the Instance README.md file for more details. This Quickstart Guide however is not using SIM.
Deploy an nplus Instance#
Before we can deploy the first nplus Instance, we need to add the Secrets for the registries and also the nscale license to the environment:
kubectl create secret docker-registry nscale-cr \
  --docker-server=ceyoniq.azurecr.io \
  --docker-username=$NSCALE_ACCOUNT \
  --docker-password=$NSCALE_TOKEN

kubectl create secret docker-registry nplus-cr \
  --docker-server=git.42i.org \
  --docker-username=$NPLUS_ACCOUNT \
  --docker-password=$NPLUS_TOKEN

kubectl create secret generic nscale-license \
  --from-file=license.xml=$NSCALE_LICENSE
Make sure the license key is called
license.xmlas that is used as the key in the charts.
Secrets are namespace-dependent (one cannot access secrets from other namespaces), so we have to deploy them for every environment/namespace we use in our cluster.
There are multiple ways of deploying an nplus Instance, the easiest one is by simply calling the helm install on the command line:
helm install --devel myinstance nplus/nplus-instanceYou can check the status of the instance using:
# kubectl get instance
NAME         HANDLER   VERSION    TENANT    STATUS
myinstance   Helm      9.1.1501   default   starting
And the component status with:
# kubectl get components
NAME                                             INSTANCE     COMPONENT       TYPE            VERSION    STATUS
component.nplus.cloud/myinstance-nstl            myinstance   nstl            nstl            9.1.1200   healthy
component.nplus.cloud/myinstance-rs              myinstance   rs              rs              9.1.1300   healthy
component.nplus.cloud/myinstance-database        myinstance   database        database        15         healthy
component.nplus.cloud/myinstance-nappl           myinstance   nappl

 core            9.1.1501   healthy
component.nplus.cloud/myinstance-web             myinstance   web             web             9.1.1500   healthy
component.nplus.cloud/myinstance-administrator   myinstance   administrator   administrator   9.1.1500   healthy
You can check the log files of the Application Layer for instance by typing:
# kubectl logs -l nplus/instance=myinstance,nplus/component=napplNotice the locator in the logs example: Instead of telling kubectl the name of the pod or rs, we use locators because there may be multiple instances of these pods later, and we want to see all logs in one go (or have ELK, EFK, Splunk, or anything similar to do that for us).
Adding an Ingress#
We need to know the available ingressClasses in our new Kubernetes Cluster, so we check that:
# kubectl get ingressclass
NAME     CONTROLLER             PARAMETERS   AGE
public   k8s.io/ingress-nginx   <none>       72m
nginx    k8s.io/ingress-nginx   <none>       72m
Microk8s comes with the most common classes, which both point to the same controller (in this case, nginx). public is indeed the default class for nplus. So we do not need to set that; it is already configured. We just need to tell the nplus instance to use a Domain for the ingress:
helm upgrade --devel \
  --set global.ingress.domain=myinstance.demo.nplus.cloud \
  myinstance nplus/nplus-instance
This now activates an ingress for https://myinstance.demo.nplus.cloud/nscale_web. The easiest and fastest is probably to add the IP to the server into your /etc/hosts file.
Adding a Certificate#
After just adding the domain, the browser will complain about the self-signed certificate. You can easily add your certificate into the secret myinstance.demo.nplus.cloud-tls, which has been created for you.
However, the canonical way is to have cert-manager or a similar tool take care of your certificates and have them generated by your CA or Lets Encrypt or similar.
If you have a running instance of cert-manager, you just need to specify the issuer:
helm upgrade --devel \
  --set global.ingress.domain=myinstance.demo.nplus.cloud \
  --set global.ingress.issuer=nplus-issuer \
  myinstance nplus/nplus-instance
In this example, nplus-issuer is the name of the issuer we created during the Addons Guide.
You can now access your new instance with https://myinstance.demo.nplus.cloud or whatever domain you might have for it.
Adding an Application#
Trying to log in to your new instance will probably give you an error message:
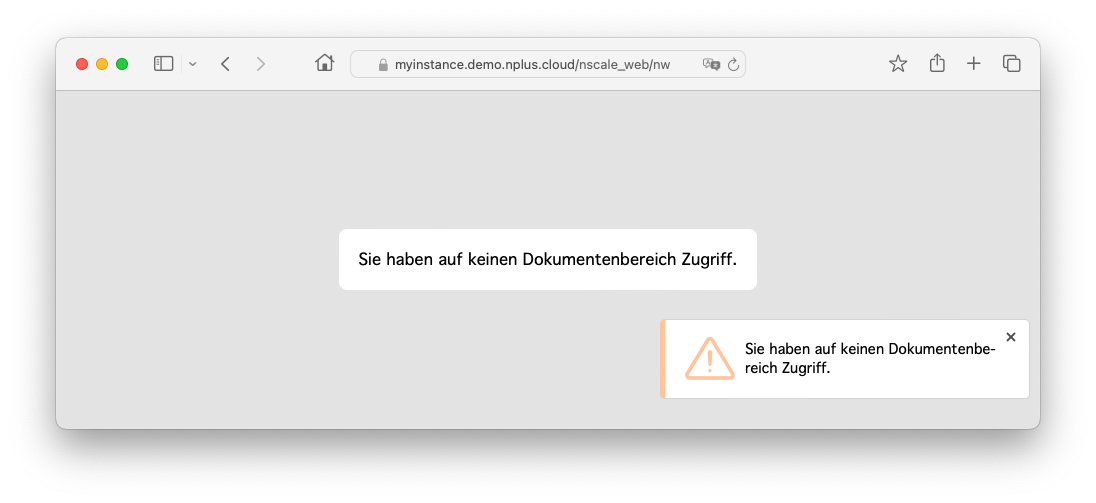
So we need to create the Document Area and maybe even add some Business App.
Business Apps can be installed from the pool. The pool is a shared file system, the nplus environment exposes to the nplus instances. This is handled by the toolbox feature, which is disabled by default.
So first, we enable it:
helm upgrade --devel \
  --set toolbox.enabled=true \
  --set nstoreDownloader.enabled=true \
  demo nplus/nplus-environment
And while we are at it, we also enable the nstore downloader, which is a job running in the background automatically downloading the latest business app installer from Ceyoniq.
It will take a couple of minutes before the apps are downloaded by the job. You can peek into the folder:
kubectl exec --stdin --tty nplus-toolbox-0 -- ls -lais /conf/poolThe Business Apps alone will not install without a proper App-Installer. You can download it from the Ceyoniq Service Portal. Once you have it, upload it to the pool as well:
kubectl cp app-installer-9.0.1202.jar nplus-toolbox-0:/conf/poolNow, you have everything you need to get an App up:
- The App Installer
- Apps
The Command Line for installing our myinstance Instance is getting quite large, so here is how to put all that into one (or more) yaml files. Create a yaml called myinstance.yaml and add the following (which is identical to the command lines above plus the App Install)
Notice that the domain is using a template function in this example. This adds the ability to reuse the same yaml for multiple instances. We will reuse it for the ArgoCD sample during the ArgoCD Quickstart Guide.
global:
  ingress:
    domain: "{{ .Release.Name }}.demo.nplus.cloud"
    issuer: "nplus-issuer"

components:
  application: true

application:
  appInstaller: "/pool/app-installer-9.0.1202.jar"
  docAreas:
    - id: "SBS"
      name: "DocArea with SBS"
      description: "This is a sample DocArea with the SBS Apps installed"
      apps:
      - "/pool/nstore/bl-app-9.0.1202.zip"
      - "/pool/nstore/gdpr-app-9.0.1302.zip"
      - "/pool/nstore/sbs-base-9.0.1302.zip"
      - "/pool/nstore/sbs-app-9.0.1302.zip"
      - "/pool/nstore/tmpl-app-9.0.1302.zip"
      - "/pool/nstore/cm-base-9.0.1302.zip"
      - "/pool/nstore/cm-app-9.0.1302.zip"
      - "/pool/nstore/hr-base-9.0.1302.zip"
      - "/pool/nstore/hr-app-9.0.1302.zip"
      - "/pool/nstore/pm-base-9.0.1302.zip"
      - "/pool/nstore/pm-app-9.0.1302.zip"
      - "/pool/nstore/sd-base-9.0.1302.zip"
      - "/pool/nstore/sd-app-9.0.1302.zip"
      - "/pool/nstore/kon-app-9.0.1302.zip"
      - "/pool/nstore/kal-app-9.0.1302.zip"
      - "/pool/nstore/dok-app-9.0.1302.zip"
      - "/pool/nstore/ts-base-9.0.1302.zip"
      - "/pool/nstore/ts-app-9.0.1302.zip"
      - "/pool/nstore/ocr-base-9.0.1302.zip"
This yaml will:
- Switch on the application chart, which will install Apps
- Tell the application to use the App Installer we just uploaded
- Define a new Document Area (SBS) to be created
- And then finally, in this example, we install SBS completely based on the Apps we downloaded from nstore. Make
sure your license covers SBS; otherwise, it will fail.
Then, you can upgrade myinstance with the new settings:
helm upgrade \
  --values myinstance.yaml \
  myinstance nplus/nplus-instance
You can specify multiple values files, so it is fine to have one for the environment settings, one for the instance settings, and a third one for the application settings. This way, you can easily create multiple instances with shared settings to have maximum re-usage among instances.
You can follow the application installer using:
# kubectl logs -l job-name=myinstance-application -f
...
Defaulted container "run" out of: run, wait-for-myinstance-nappl (init), copy-conf (init)
2024-03-11 16:08:33,918 [main] INFO  com.ceyoniq.nscale.appconfig.NscaleServerWriter - updating CustomConfiguration Procurement to 9.0.1302
2024-03-11 16:08:33,993 [main] INFO  com.ceyoniq.nscale.appconfig.NscaleServerWriter - finished app configuration..
App '/pool/pm-app-9.0.1302.zip' successfully installed
install App /pool/sd-base-9.0.1302.zip into SBS
Try installation of app zip: /pool/sd-base-9.0.1302.zip
2024-03-11 16:08:36,406 [main] INFO  com.ceyoniq.nscale.businessapps.sd.base.Installer - App ('sd-app') not installed yet. Installing version 9.0.1302
2024-03-11 16:08:43,031 [main] INFO  com.ceyoniq.nscale.appconfig.NscaleMapper.Icons - Installing icons..
2024-03-11 16:08:43,033 [main] INFO  com.ceyoniq.nscale.appconfig.NscaleMapper.Folders - Installing Folders..
2024-03-11 16:08:43,037 [main] INFO  com.ceyoniq.nscale.appconfig.NscaleMapper.FolderTemplates - Installing FolderTemplates..
...
done config scripts.
running application scripts
Running /application/*.sh
done application scripts.
Once it is done, close your browser (to make sure you open a fresh session) and try to log in again:
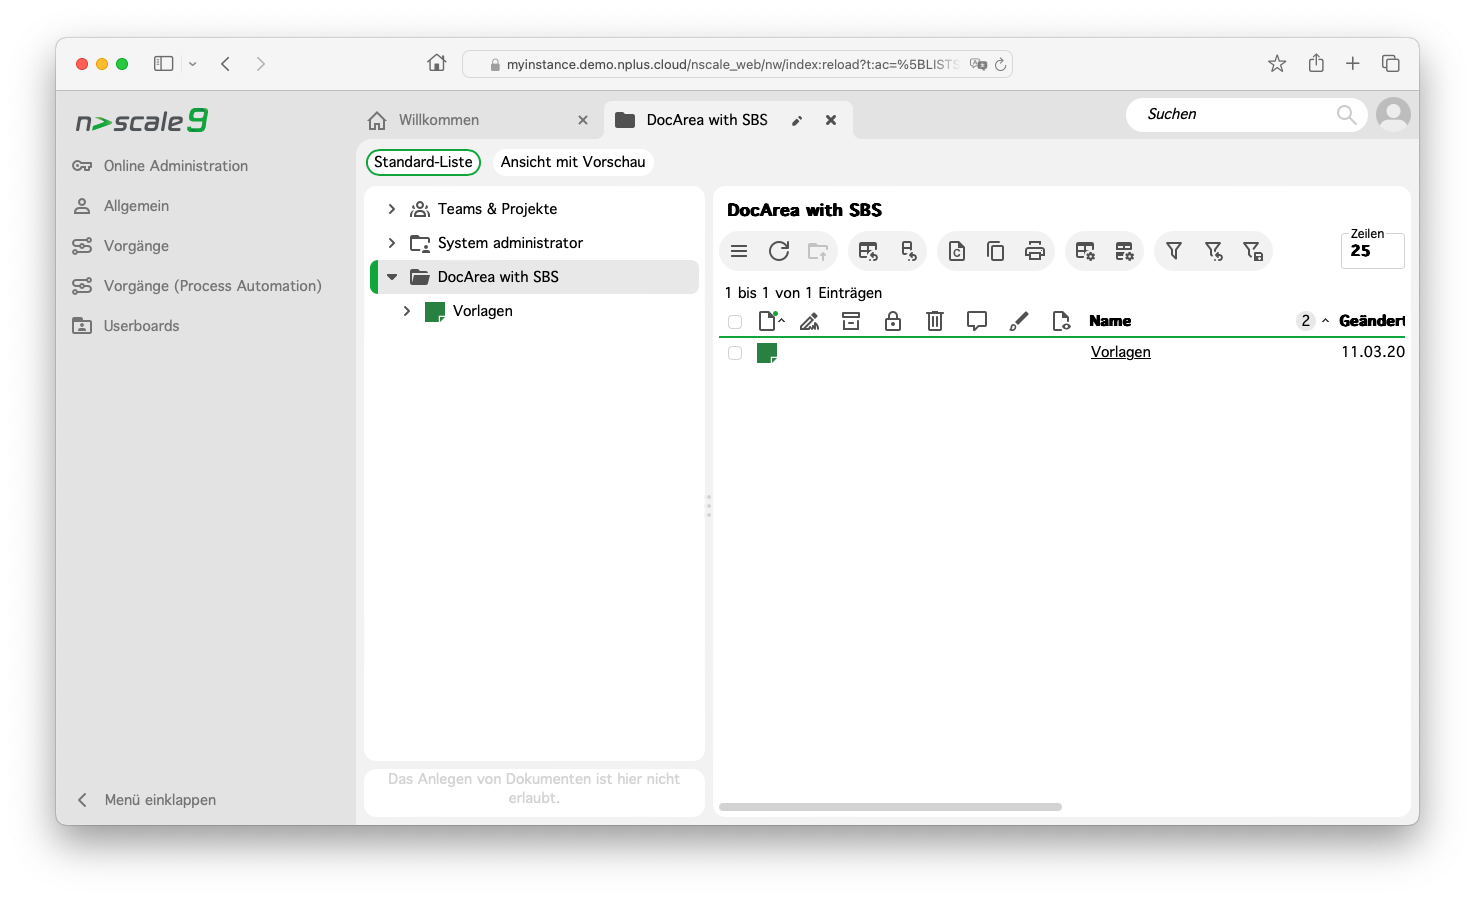
Admin does not have any SBS user roles by default; that is why you do not see any Apps after login.
Further Reading#
You will find more complex examples in the samples directory.
Please have a look at the README.md of the charts to explore more configuration options:
helm show readme nplus/nplus-environment
helm show readme nplus/nplus-instance
There are also charts for every component used by the instance umbrella chart.
You can also start configuring your instance by retrieving and altering the values.yaml of the chart.
helm show values --devel nplus/nplus-instance > myinstance.yamlThen edit this file. When you are done, apply it:
helm upgrade --devel \
  -f myinstance.yaml \
  myinstance nplus/nplus-instance
Please be aware that the umbrella
values.yamldoes not contain all possible configuration options of the child charts.